The discovery protocols CDP – Cisco Discovery Protocol, and LLDP – Link Layer Discovery Protocol – are both highly valuable assistance in network configuration and troubleshooting. These protocols are constructed to only be sent on the link between exactly two devices, i.e., they are not forwarded on through the network. Instead, they are designed to provide information of the immediate “neighbors” of devices like switches, routers, and firewalls.

If you have a physical Windows Server, or a wired Windows client, it can at times be useful to detect the physical cable connection point. This can, for example, be helpful when cooperating with the network team.
Normally, a Windows administrator have very limited access to any potential CDP or LLDP information sent from the physical network. However, using the built-in tool PKTMON, we can gain full insight and “discover” our own position in the network.
See this page for the full list of articles of all the features of PKTMON.
If being uncertain if LLDP or CDP is enabled in your network, add a filter for both protocols. (It is also possible that neither are enabled, or is only enabled on specific ports, e.g., to other switches.)

Start with clearing any current filters and add the new:
pktmon filter remove
pktmon filter add "CDP" -m 01-00-0C-CC-CC-CC
pktmon filter add "LLDP" -d LLDP
Verify the applied filters:

pktmon filter listAcquire the ID number for the Network Interface Card:

pktmon comp list
If we are only looking for the name of the physical switch, we can observe the results directly on the command line:
pktmon start -c -m rt -s 16 --pkt-size 0 --comp <INTERFACE-ID>
Above, basic output from a CDP frame. (Captured in an isolated lab environment.)

Above, basic output from a LLDP frame. (Captured in an isolated lab environment.)
As displayed, we can see some limited amount of information in the real-time mode on the command line. If we wish to acquire further details, such as the specific switch port we are connected to, we must use a slightly different approach with PKTMON.
As before, ensure we have the network id number available (pktmon comp list), as well as having the correct filters applied:
pktmon filter remove
pktmon filter add “CDP” -m 01-00-0C-CC-CC-CC
pktmon filter add “LLDP” -d LLDP
Now start the capture with the following command:

pktmon start -c --pkt-size 0 -f CDP.etl --comp <INTERFACE-ID>(The file specified with -f could be named anything.)
Then run:

pktmon counters --live --refresh-rate 1
Wait until the counters are no longer zero. When at least one packet have been received, stop the capture with:
pktmon stopNow, we will convert the captured data into a readable format. The pktmon etl2txt command can convert the ETL file into a text file version.

pktmon etl2txt CDP.etl -o CDP-v1.txt -v 1First specify the name of file with the file you have already captured, e.g., CDP.etl, and use the -o the name the output text file.
The -v 1 is necessary to increase the verbose-level for the LLDP / CDP data are to be visible.
You will now have a text file in the same working directory. Open this file with Notepad and you should be able to see the detailed LLDP / CDP data:
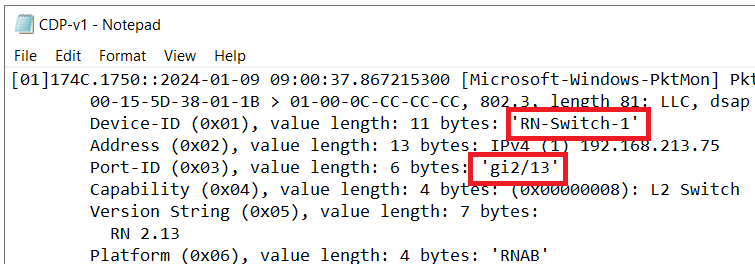
Text file data for CDP. Note the various detailed information, including the switch name and switch port-ID. (Data from an isolated lab environment.)

Text file data for LLDP. Note the various detailed information, including the switch system name and switch port number. (Data from an isolated lab environment.)
For advanced DNS troubleshooting with PKTMON, please see this article.
Hi Rickard,
Really enjoyed reading this series. However I’ve run into an annoying problem: pktmon is only able to capture these packets if the interface is in promiscuous mode – otherwise they’re invisible. This is on several different Windows 11 machines I’ve tried.
I can do it (i.e., setting promiscuous mode) manually before beginning the capture, but it seems to me like I shouldn’t have to. Do you have any idea why it works for you, but not for me?
Thank you!
Hello Ido,
And thanks for your comment. I am glad to hear you have appreciated the articles.
As for your issue, are you referring specifically to the CDP/LLDP frames? I did a quick test on a personal Windows 11 on a wired network, and was able to collect LLDP without enabling promiscuous mode on the interface.
You are able to collect other arbitrary packets on the same machine?
Best regards, Rickard
Hi Rickard,
Yes, IP traffic is captured without any problems, and actually LLDP too – only CDP isn’t seen (earlier I was testing on a machine whose switch did not enable LLDP).
It looks like there’s a dedicated driver for LLDP capture (mslldp.sys), which probably handles promiscuous mode correctly, but nothing equivalent for CDP.
I don’t believe the mslldp.sys driver is involved in the PKTMON capture process, though. As far as I know, the driver is used, if configured, to send and receive LLDP frames as any other network device.
Regarding the need for promiscuous mode, meaning somewhat equivalent to “accept also frames that are not addressed to me”, the destination MAC address for both LLDP and CDP have bit number 8 set to 1, meaning they are multicast addresses, meaning all network cards *should* accept them.
LLDP: 01:80:C2:00:00:0E
CDP: 01:00:0C:CC:CC:CC
From that perspective, it is not obvious at all why you would need to manually set the NIC to promiscuous mode to be able to receive the CDP frames.
Best regards, Rickard
You are correct, of course. That’s what’s puzzling here.
For the record, the behaviour of Wireshark on the same machine is identical (LLDP seen always, CDP only in promiscuous mode). I’m going to test different drivers and OS versions.
Very interesting indeed, with the same behavior also in Wireshark. Let me know what you find further regarding this.
Well, on a Linux machine (Ubuntu), the situation is reversed – only CDP is seen without promiscuous mode.
BUT – there’s an option to ‘subscribe’ to the multicast address (01:80:C2:00:00:0E for LLDP) so that packets are passed to the OS (the command is “ip maddress add 01:80:C2:00:00:0E dev “). I couldn’t find an equivalent on Windows.
I suppose it comes down to decisions made by the driver.